Contact Support

Bookmark This Page

Getting Started

Marketing MO is a comprehensive marketing planning app. Use it to define marketing strategies, create campaign plans, measure marketing investments and design and manage marketing projects. To get feel for how it works, try:

  1. Creating a plan for a marketing activity, downloading it, and then completing it in the project grid online
  2. Browsing the marketing tools: 30 subjects; 247 deliverables; 667 marketing tools
  3. Opening a pre-built marketing project to access the tools and interact with the project management grid
  4. Adding users to your trial account to let them view the tools
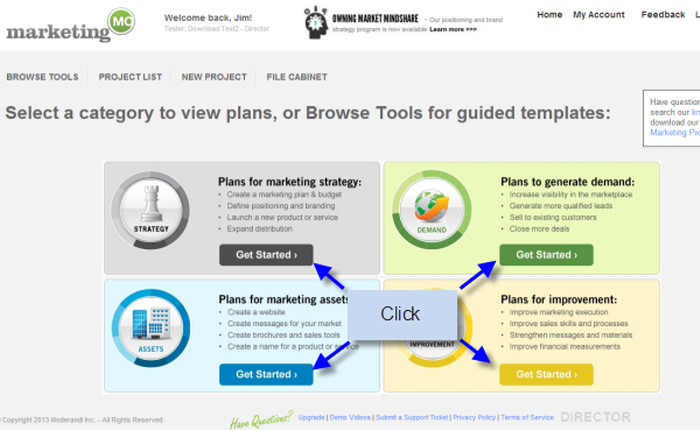
Creating a Plan

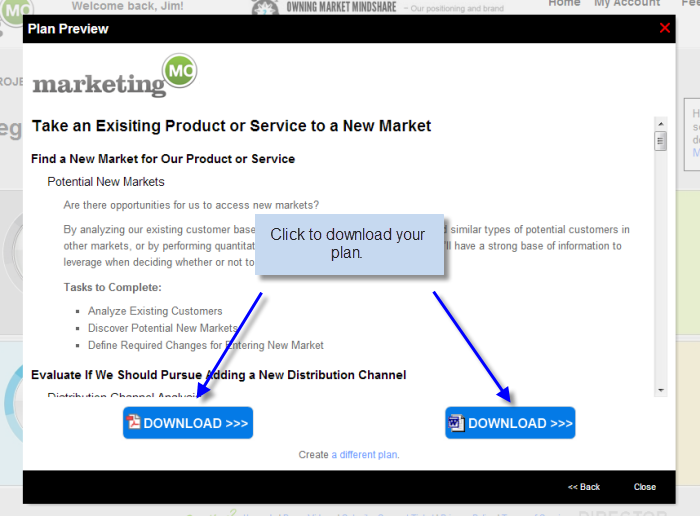
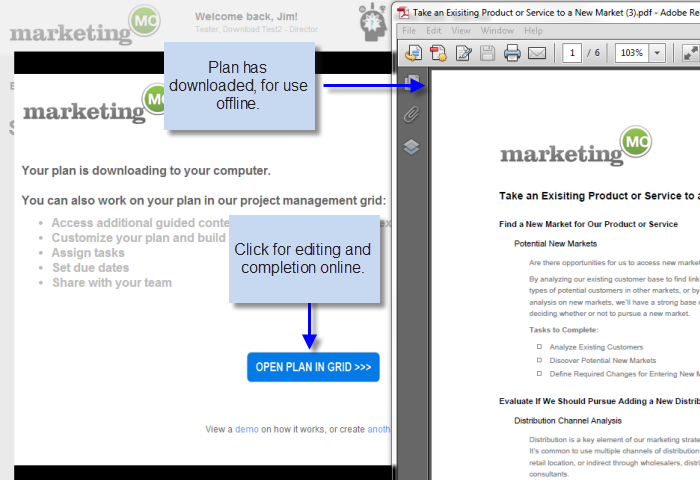
Select and download a plan from your homepage. Then, open it in the project grid to access the interactive templates and manage each step.

Homepage - Plans

Plan Wizard

Plan Wizard 4

Browsing Marketing Tools

Or, start by clicking Browse Tools blue arrow on the homepage after you login, or by clicking on the Browse Tools navigation in the upper left. This opens the Browse Tools window. Marekting M.O. Getting Started In the Browse Tools view click on different Categories on the left. The list of the Deliverables and Tasks in each will display in the second column to the right. The below example displays the Deliverables and Tasks from the Brand Strategy Category: Getting Started - Browse Categories and Deliverables And this example displays the Deliverables and Task from the Social Media category: Getting Started - Browse Categories and Deliverables - Social MediaThe right-hand viewer displays the marketing tool (the guided, interactive content you can use in your project).

  • The Categories are numbered 1-30. For example, Brand Strategy is 2.
  • The Deliverables are numbered within the Category. For example, Brand Architecture is the third Deliverable in Brand Strategy and is 2.3 (Category.Deliverable – number.number is the taxonomy).
  • The Task is the interactive marketing content and is labeled a through z. For example, Determine Brand Means is the third tool in the Brand Architecture deliverable and is labeled 2.3.c (Category.Deliverable.Tool – number.number.letter is the taxonomy.)

To begin using the tools, select the individual tools, deliverables or categories you wish to add to your project and click “Add Selected to Project” in the lower right. You’ll be prompted to enter in your project name, and when you click Ok, your Project Details will appear and you’re ready to start working. Getting Starting in Marketing M.O. - Browse Tools

Working with the Marketing Tools in the Project Details View

Your tools are organized by hierarchy in your project details grid, on the left under the Activity heading. They’re organized by

  • Category– Bold black text
    • Deliverable– Bold black text indented
      • Task – Gray text indented

The marketing tools are listed as individual task line items in your project. To open a marketing tool, click on the Open Marketing Tool icon to the right of the name & number. Getting Started Brand Strategy Marketing Project Here you can interact with the content and enter in your responses. Make sure to save your work by clicking Save in the lower right. Marketing M.O. Getting Started Brand Means Exercise For more details on using the tools, click here. Or, check out our screencast demos or the Getting Started FAQs below.

Opening Tools

You can view the tools by clicking on the Browse Tools main navigation. To use the tools, you must add them to a project, then from the Project Details screen, click the Open icon and the tool will open in a new window for use.

Back to Top

Entering Values

After opening a tool from your project, type directly into the field to input your responses. You don’t have to answer every question – if you leave it blank it won’t display in your report. Double and triple entry fields display in a table in your report. Click the green plus to the right to add more fields, and click the paper icon to view any previous entries for the field.

Make sure to click Save before closing. More>>>

Back to Top

Adding Tools

To add tools to your project, click the Add dropdown from the Project Details screen to open the Browse Tools window. Select the tasks, deliverables or categories you’d like to add and click Add Selected to Project.

Back to Top

Modifying Descriptions

To modify the description of the task or deliverable, click the Edit icon and enter/modify the text in the Description field. These descriptions will display when you output your work to a PDF report.

Back to Top

Outputting Results

To output the results of your work, in the Project Details screen click the green PDF icon to publish to a PDF. You can out the results of a task, a deliverable (which includes all the tasks), a category (which includes all the deliverables) or a project (which includes all the categories). To output a project content, select the Reports dropdown and the Project Content.

The PDFs at each level contain different formatting. More>>>

Back to Top

Adding Activities

To add your own Categories, Deliverables or Tools, click the Add dropdown and select the type of activity to add. Enter in the details in the pop-up screen.

To add tools to your project, click the Add dropdown and select Tools. This will open the Browse Tools window. Any tools you select will be added to your existing project.

Back to Top

Editing Activities

There are two ways to edit an activity: Click the Edit icon and change it in the pop-up box or  double click the activity line and use the in-line editing feature to change it.

Back to Top

Sorting & Reordering

There are two ways to sort activities: Manually moving them with the drag and drop feature or sorting activities via column headers.

To drag and drop activities in your project, click and hold the activity and drag and drop it to your desired position.

You may also sort by any particular column by clicking on the arrow to the right of the column header and choosing your sort option.

You may wish to change your view by selecting the View dropdown and selecting your view option. The column header sorting will then apply to your new view.

Back to Top

Changing the View

You have the option to hide the project details so you have more screen real estate to view your project activities.

Simply click the Collapse option in the top black bar to hide the details and view more Activities. Click the Expand option to return to the normal view.

You may wish to change your view if the activities by selecting the View dropdown and selecting your view option. The column header sorting will then apply to your new view.

Back to Top

Attaching/Downloading Files

You may wish to attach files to your project for future access. To do so, in your Project Details screen select the Files dropdown and then Add or Download files from here.

Back to Top

Preview Accounts

You may create a free Preview account to test drive the app. Preview accounts expire automatically after 14 days. Only one Preview account per email address.

You may upgrade from a free Preview account at anytime. Click the Upgrade link in the upper right of your account (login here).

Or, create a new account here.

Back to Top

How to Upgrade

You may upgrade from a free Preview account or from one paid account level to another at anytime. Your credit card will be charged the new monthly payment, or the discounted annual payment (at your choice) upon upgrading. You may upgrade here.

Back to Top

Billing

If you’re on a monthly subscription, your credit card will be invoiced at signup and every 30 days after. We currently use Chargify to handle our subscription management, using their API to allow you to update and modify your credit card information from the My Account link within your account. If you select the discounted annual payment option, you card will be charged once per year at your account creation date.

We use Authorize.Net as our payment gateway.

Back to Top

Exporting Data

You may export your data in three ways: outputting your task, deliverable, category or project reports to PDF and saving them locally, outputting Project Reports, and by downloading any files that you’ve uploaded to our servers.

When you close your account we promise to keep your data safe and secure for 12 months in case you wish to re-activate your account. After 12 months we permanently delete all data from closed accounts.

You also have the ability to delete all of your projects before closing your account.

Back to Top

Closing/Cancelling Your Account

If you’re on a month-to-month plan, you have the option to close your account at anytime without penalty. Simply submit your cancellation request through the Feedback link within your account. This is secure way to ensure that you’re not billed for any future service, as this method is far more reliable than email or phone requests. Once you cancel we’ll close your account and you will not billed for any future service. Since we’re a pay-as-you-go service, we don’t issue refunds for closing your account before your paid subscription period expires.

If you’re on a pre-paid plan, you may cancel at anytime, but your account will stay open until the end of your plan. We do not issue refunds for early cancellation.

Back to Top